

3/2012 edit: Have a look here and at this thread for the specific changes required for the 2011-12 Rzr.
7/2011 edit: Found out black ABS parts can be ordered from any ACE hardware store. Free delivery to your local store...cheap & easy!
I've been on the fence for many months trying to decide if a snorkel setup is right for me. I don't like cutting big holes in my plastic but snorkeling the intake appears to be the cheapest path to cleaner air to my cylinders.
Installing a snorkel.
There have been several members who've posted a tip or 2 and some pictures of the installation of snorkels on a Rzr. I tried to find this scattered info prior to diving into the job myself. Here then is my contribution. I don't break any new ground here, just an attempt to pull it all together into one how-to post with instructions, pics and a material list.
First a disclaimer: There's more than one way to skin this cat. I actually bought enough extra components to do the job a couple different ways. What I ended up with is just what seemed to make the most sense to me at the time.
A note on ABS: I wanted to use black ABS components in making my snorkel because I didn't want to deal with painting or coating white PVC parts. Inevitable scratches would need to be touched up or left to stand out like a sore thumb. ABS isn't common in my locale and I assumed that's because it's inferior to the very common PVC. The counter guy at the Genova factory outlet informed me that ABS is actually superior to PVC and has better shock resistance so in some areas of the country where the ground is rocky ABS is preferred for underground use. Whatever.
Genova sells the parts direct and will ship.
Genova Office and Factory Directory
You might also try a camper/mobile home supply since ABS is commonly used in their plumbing.
Here's what I used:
(all 2")
3- 90 deg. elbows
3- 90 deg. street elbows
1- 45 elbow
1- 45 street
1- 22 elbow
6- 2" rubber couplers
5 feet of 2" pipe
Small can of ABS cement
Total cost of supplies was $43.00 + tax. Half the cost was for the 6 rubber couplers ($4 each!).
Remove the bed, seats, access door, upper air box (2 plastic rivets), belt exhaust (2 rivets & hose clamp), and coil.
Don't cement anything until all is assembled and everything fits. It's easy to wiggle pipes in rubber couplers and twist pipes in elbows to finesse them into the correct location. You are aiming for the lower belt snorkel to be centered at the frame with its 2 companions 3.5" center-to-center each side.
Upper belt snorkel:
Loosen clamp and remove plastic duct along with the stock coupler.
Install 2" coupler, 90 deg. street elbow, 3.5" length of pipe and a 45 elbow.
Lower belt snorkel:
Loosen the hose clamp attaching the factory coupler to the plastic duct and remove the duct, keeping the factory coupler installed to the CVT housing. Try not to remove this coupling as it's extra aggravation trying to reinstall it. Install a 90 deg. street elbow into the factory coupler, 2" length of pipe to act as a coupler, 2" rubber coupler, 90 street elbow and a 45 street.
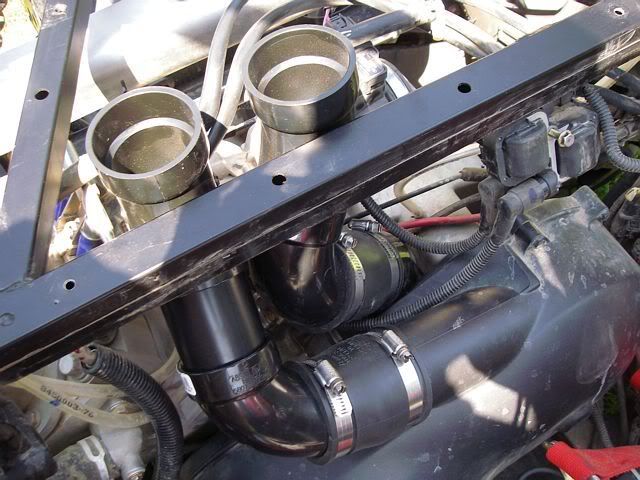
Here's what it should look like at this point:
![Image]()
Air intake:
Remove the plastic duct and saw off the top until a 2" rubber coupler fits tightly over it.
![Image]()
(I did try a 3X2 coupler stretched over the top of the duct but couldn't get a good seal)
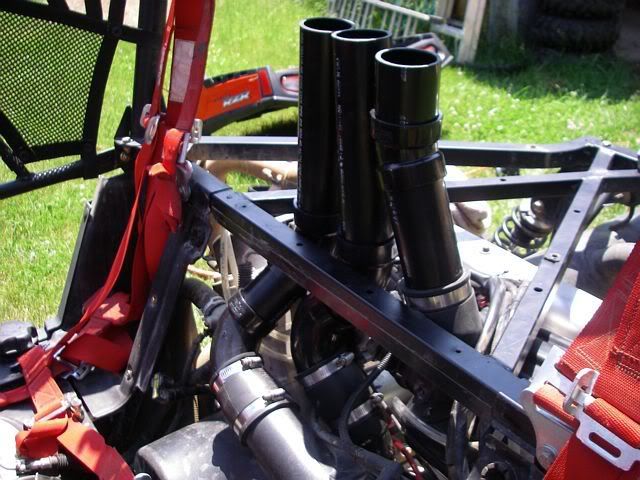
5" (more/less to adjust) of 2" pipe, 22 deg. elbow. The distance from the top edge of the frame to the bottom surface of the bed where the pipes will poke through is 7.5". All 3 snorkels need to be a couple inches longer to insert up into the rubber couplers above the bed. So cut 3 lengths of pipe to bring the snorkels up 9-10" above frame.
So far:
![Image]()
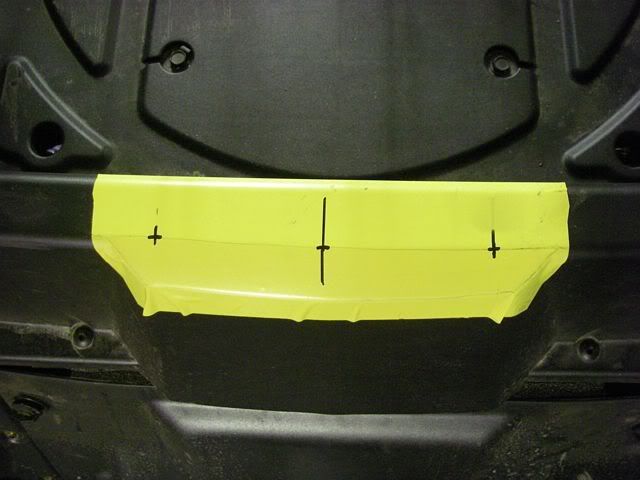
Now work on the bed.
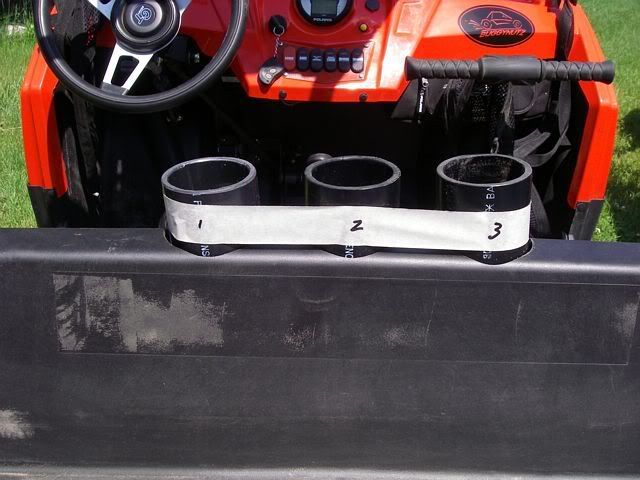
Apply a strip of masking tape to the top edge of the bed/intake hood. Measure & mark the centerline. Mark a line 3.5" to either side of center. Cross these 3 lines where the top flat surface is beveled downward towards the cabin.
![Image]()
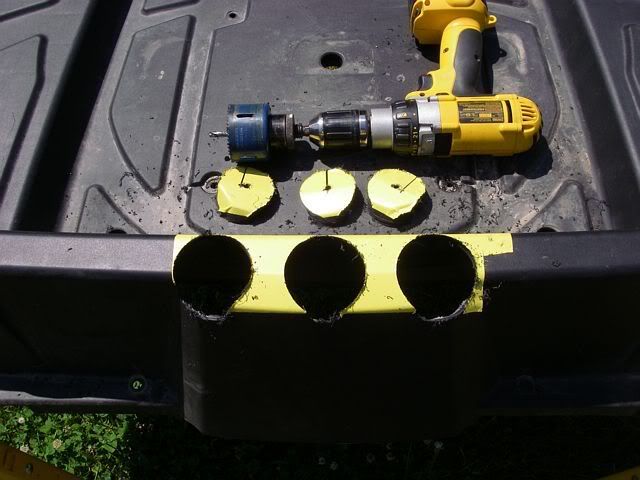
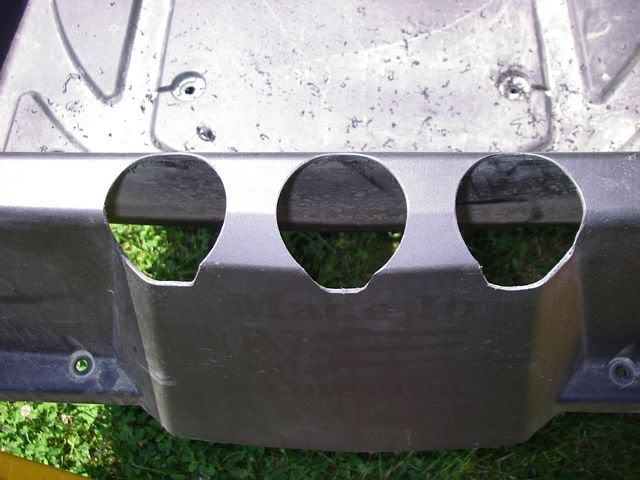
Center punch the 3 crosses and use a 2.5" holesaw to drill the 3 holes.
![Image]()
With a sharp holesaw there will be almost no filing or cleanup needed to the plastic. Just file or sand away the fuzzies.
![Image]()
Test fit the bed over the pipes. The fly in the ointment is the 22 degree elbow. It needs to be low enough not to hang up the bed. Wiggle/twist/trim the components to get the pipes straight and mostly plumb. Honestly they come out fine without any fiddling needed. The rubber couplers that will be on top of the bed will hide any slight angle or unevenness in the pipes.
Remove the bed and mark the position and insertion depth of the pipes & elbows with tape & a marker so when you start cementing the joints you can return them to the same position. Once the joints are lubed with cement it's very easy to insert the pipe deeper into the socket, messing up your alignment. Go ahead & glue all the parts together except the last 3 pieces of pipe up top. Install the bed and use a length of masking tape to mark a level line on all 3 pipes.
![Image]()
Trim them to length and then glue them in place.
Mount the bed.
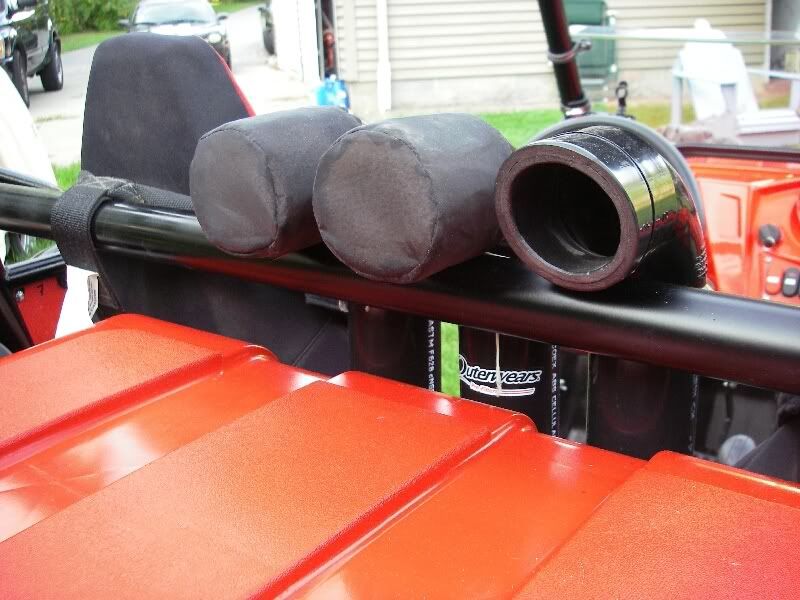
Install 2" rubber couplers. Measure & cut 3 lengths of pipe to locate your final 90 deg. elbows where you want them. The cut list assumes mounting the elbows so they just peek over the rollbar. Buy more pipe if you plan to take them all the way to the roof.
![Image]()
7/2011 edit: Found out black ABS parts can be ordered from any ACE hardware store. Free delivery to your local store...cheap & easy!
I've been on the fence for many months trying to decide if a snorkel setup is right for me. I don't like cutting big holes in my plastic but snorkeling the intake appears to be the cheapest path to cleaner air to my cylinders.
Installing a snorkel.
There have been several members who've posted a tip or 2 and some pictures of the installation of snorkels on a Rzr. I tried to find this scattered info prior to diving into the job myself. Here then is my contribution. I don't break any new ground here, just an attempt to pull it all together into one how-to post with instructions, pics and a material list.
First a disclaimer: There's more than one way to skin this cat. I actually bought enough extra components to do the job a couple different ways. What I ended up with is just what seemed to make the most sense to me at the time.
A note on ABS: I wanted to use black ABS components in making my snorkel because I didn't want to deal with painting or coating white PVC parts. Inevitable scratches would need to be touched up or left to stand out like a sore thumb. ABS isn't common in my locale and I assumed that's because it's inferior to the very common PVC. The counter guy at the Genova factory outlet informed me that ABS is actually superior to PVC and has better shock resistance so in some areas of the country where the ground is rocky ABS is preferred for underground use. Whatever.
Genova sells the parts direct and will ship.
Genova Office and Factory Directory
You might also try a camper/mobile home supply since ABS is commonly used in their plumbing.
Here's what I used:
(all 2")
3- 90 deg. elbows
3- 90 deg. street elbows
1- 45 elbow
1- 45 street
1- 22 elbow
6- 2" rubber couplers
5 feet of 2" pipe
Small can of ABS cement
Total cost of supplies was $43.00 + tax. Half the cost was for the 6 rubber couplers ($4 each!).
Remove the bed, seats, access door, upper air box (2 plastic rivets), belt exhaust (2 rivets & hose clamp), and coil.
Don't cement anything until all is assembled and everything fits. It's easy to wiggle pipes in rubber couplers and twist pipes in elbows to finesse them into the correct location. You are aiming for the lower belt snorkel to be centered at the frame with its 2 companions 3.5" center-to-center each side.
Upper belt snorkel:
Loosen clamp and remove plastic duct along with the stock coupler.
Install 2" coupler, 90 deg. street elbow, 3.5" length of pipe and a 45 elbow.
Lower belt snorkel:
Loosen the hose clamp attaching the factory coupler to the plastic duct and remove the duct, keeping the factory coupler installed to the CVT housing. Try not to remove this coupling as it's extra aggravation trying to reinstall it. Install a 90 deg. street elbow into the factory coupler, 2" length of pipe to act as a coupler, 2" rubber coupler, 90 street elbow and a 45 street.
Here's what it should look like at this point:
Air intake:
Remove the plastic duct and saw off the top until a 2" rubber coupler fits tightly over it.

(I did try a 3X2 coupler stretched over the top of the duct but couldn't get a good seal)
5" (more/less to adjust) of 2" pipe, 22 deg. elbow. The distance from the top edge of the frame to the bottom surface of the bed where the pipes will poke through is 7.5". All 3 snorkels need to be a couple inches longer to insert up into the rubber couplers above the bed. So cut 3 lengths of pipe to bring the snorkels up 9-10" above frame.
So far:
Now work on the bed.
Apply a strip of masking tape to the top edge of the bed/intake hood. Measure & mark the centerline. Mark a line 3.5" to either side of center. Cross these 3 lines where the top flat surface is beveled downward towards the cabin.
Center punch the 3 crosses and use a 2.5" holesaw to drill the 3 holes.
With a sharp holesaw there will be almost no filing or cleanup needed to the plastic. Just file or sand away the fuzzies.
Test fit the bed over the pipes. The fly in the ointment is the 22 degree elbow. It needs to be low enough not to hang up the bed. Wiggle/twist/trim the components to get the pipes straight and mostly plumb. Honestly they come out fine without any fiddling needed. The rubber couplers that will be on top of the bed will hide any slight angle or unevenness in the pipes.
Remove the bed and mark the position and insertion depth of the pipes & elbows with tape & a marker so when you start cementing the joints you can return them to the same position. Once the joints are lubed with cement it's very easy to insert the pipe deeper into the socket, messing up your alignment. Go ahead & glue all the parts together except the last 3 pieces of pipe up top. Install the bed and use a length of masking tape to mark a level line on all 3 pipes.
Trim them to length and then glue them in place.
Mount the bed.
Install 2" rubber couplers. Measure & cut 3 lengths of pipe to locate your final 90 deg. elbows where you want them. The cut list assumes mounting the elbows so they just peek over the rollbar. Buy more pipe if you plan to take them all the way to the roof.


")


